
ADVANTAGES OF OUR PRODUCTS
კოლექცია FLOOREO English Herringbone Collection embodies the strength and resilience of mountain peaks, conveying their power and grandeur. All the beauty of the mountains is captured in our herringbone decor designs.
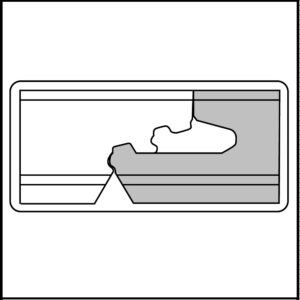
FLOOREO laminate does not require left (B) and right (A) boards—it consists exclusively of (A) boards, which significantly simplifies and speeds up the installation process.
PRESERVING THE INTEGRITY OF THE FLOOR COVERING:
- Using felt pads under the legs of chairs, tables, and furniture.
- For high-traffic areas, place a textile mat to help trap dirt and protect the floor.
- For office chairs, we recommend using a protective mat to prevent scratches and prolong the life of the flooring.
- Do not place wet plant pots directly on the floor; always use a suitable tray or mat.
CLEANING AND CARE
FLOOREO laminate flooring is delivered ready for use and sealed.
Do not use cleaning agents that contain abrasive or film-forming substances.
For best results, clean the floor with a vacuum cleaner (hard floor nozzle) or wipe with a slightly damp cloth and clean water.
Any liquid spilled on the floor must be removed within 2–3 hours.
Do not use polishes, waxes, or abrasive cleaners.
WARRANTY TERMS
The manufacturer provides a warranty against wear-related damage.
Under these warranty conditions, wear is defined as the complete abrasion of the decorative layer over an area of at least 1 cm².
The warranty does not cover edge wear.
Panels with visible defects must not be installed.
Before installation, all panels must be checked for material defects.
To be eligible for warranty claims, all installation instructions (included inside each pack) must be followed.
WARRANTY PERIOD
Wear resistance class 33/AC5:
30 years in residential use / 12 years in commercial use.
The warranty applies only to wear-related damage under normal usage in designated areas.
It does not cover laminate installed in damp or wet areas (e.g. bathrooms, saunas).
Damage from excessive loading, mechanical impact, improper use, or lack of proper care is excluded.
To validate proper care, purchase receipts for approved cleaning and maintenance products must be presented.
Claims must be submitted in writing with the original purchase receipt within 30 days of discovering a defect.
The manufacturer reserves the right to inspect the defect on-site or delegate inspection to third parties.
WARRANTY COVERAGE
If the claim is accepted, the manufacturer will either repair the damaged area or provide replacement material for the worn surface, at their discretion.
Costs related to removal of the old floor and waste disposal are not covered.
If the original panel type is no longer available, an equivalent product from the current range will be provided.
To benefit from the warranty, retain one copy of the installation insert and the original invoice.
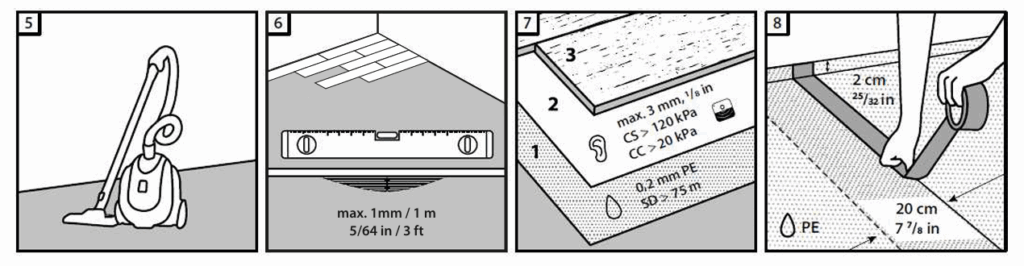
1. PREPARATION / STORAGE
ACCLIMATIZATION
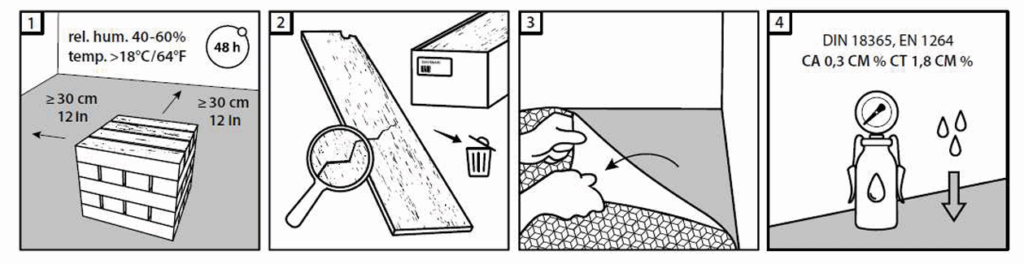
Before installation, allow FLOOREO laminate to acclimate in the room.
Place unopened boxes horizontally in the room of installation for at least 48 hours.
PRODUCT INSPECTION
Please inspect the boards for damage or visible defects before installation.
We recommend installation in daylight or well-lit conditions.
2. SUBFLOOR PREPARATION
If old coverings such as carpet or linoleum are present, they must be completely removed.
The subfloor must be clean, level, and dry.
Moisture content must be tested and must not exceed 3%.
REQUIREMENTS:
- Height variations must not exceed 2–3 mm per 1 m².
- A thermal expansion gap of 10–15 mm must be maintained between the floor and the wall.
MINERAL SUBSTRATES AND TILES
Always use a vapor barrier film when installing over mineral subfloors.
WOODEN SUBFLOORS
Ensure the surface is level, vibration-resistant, dry, free from mold and insects, and adequately ventilated.
Do not use polyethylene vapor barriers on wooden subfloors.
3. INSTALLATION MATERIAL AND TOOLS

- Level, straightedge
- Vapor barrier film
- Underlay (maximum thickness 2–3 mm)
- Measuring tape, ruler
- Angle square, bevel gauge
- Pencil or marker
- 10 mm spacers
- 50 mm wide tape
- Saw
- Hammer
4. UNDERLAY INSTALLATION
Installation should follow this order:
Vapor barrier film → Underlay → Flooring
A polyethylene film is essential as a vapor barrier over mineral bases to prevent moisture-related damage.
The underlay influences noise reduction, thermal insulation, and floor durability.
Thickness should not exceed 2–3 mm.
5. INSTALLATION
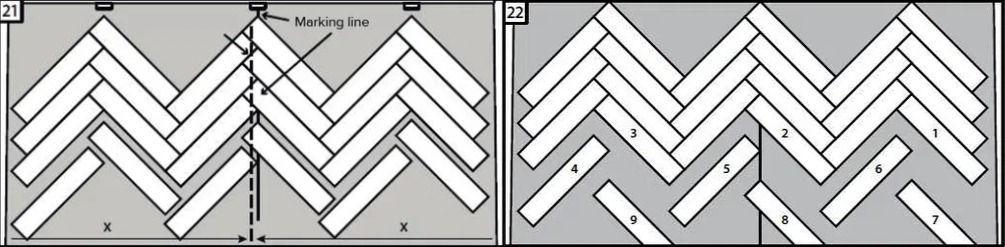
These instructions will help you easily install FLOOREO laminate in a herringbone pattern.
A distinctive feature of this product is that each board has a universal end lock.
One side of the board features a characteristic tongue, while the other side has a matching groove.
კოლექცია tongue of one board fits into the groove of the other.
STEP 1
Take any board and place it so that the groove on the long side faces you.
This board will serve as the fixing board to help secure the first boards in the herringbone layout.
Attach the next board to the fixing board, leaving more space to the right than the board’s width.
Make sure the tongue fits securely into the groove of the fixing board—you will hear a distinct click
(a wooden or rubber mallet can be used for securing).
Then, attach another board to the fixing board at a 90-degree angle.
IMPORTANT: Grooves must always face the direction of installation, and tongues must face the opposite direction.
STEP 2
Continue laying the boards in a herringbone pattern, alternating their direction.
IMPORTANT: Ensure the herringbone pattern is even and symmetrical, and that the boards are tightly joined with no gaps or seams.
After laying three or four rows of boards, remove the fixing board.
It is no longer needed for fixation and can now be used as a regular board for further installation.
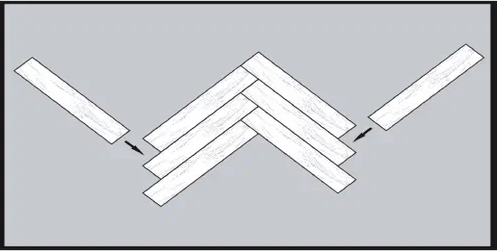
STEP 3
Next, place the assembled section in the center of the room at a 45-degree angle to the wall.
Now continue installation to the left and right sides relative to the assembled section.
To do this, take a board and attach it at a 90-degree angle to the top board
(first on one side, then on the other).
Continue assembling the floor using the same principle.
IMPORTANT: Remember that the groove must always face the direction of installation, and the tongue the opposite.
STEP 4
Once the main floor area is assembled, fill in the missing triangular sections along the walls to maintain the herringbone pattern around the perimeter.
Use a square to measure the required board length and cut the excess at a 45-degree angle.
IMPORTANT: Boards less than 20 cm in length should be glued using PVA glue or another suitable wood adhesive.
Laying FLOOREO Deck-Style Laminate

The RIVERS collection by FLOOREO is a story of endless movement, of a river winding around rocks and trees to create a melody that calms the soul and inspires reflection.
ADVANTAGES OF OUR PRODUCTS
The RIVERS collection uses the SMART-CLICK lock. The assembly of this collection is very easy, just pressing from top to bottom. No additional longitudinal padding is required.
MAINTAINING THE INTEGRITY OF THE FLOORING:
- Use felt pads under the legs of chairs, tables and furniture
- For high use areas, use a textile mat
- For the office chairs, it is recommended to use a special mat that can prevent scratches and extend the life of the flooring
- Do not place wet plant pots on the floor, always use a suitable carpet pad.
MAINTENANCE RECOMMENDATIONS
FLOOREO laminate flooring is delivered ready to use and is hermetically packaged. Do not use cleaning agents containing abrasive or film-forming substances. It is preferable to clean the floor with a vacuum cleaner (hard floor attachment) or with a cloth lightly moistened with clean water. Moisture on the surface should be removed within 2-3 hours. Do not use polishes, waxes or abrasive cleaners.
WARRANTY CONDITIONS
The manufacturer grants warranty for damage caused by wear and tear. According to the provisions of these warranty conditions, wear and tear is dened as complete abrasion of the decorative layer in an area of at least 1 square cm. The warranty does not cover wear and tear on the edges of the panels. It is not allowed to lay panels that have visible defects. It is necessary to check the panels for material rejection before laying. In order to fulfill the warranty obligations, it is necessary to observe and follow all the instructions in the laying manual, which is located inside each package.
WARRANTY
Laminate of abrasion class 33/AC5 is specified for 30 years of residential use and 12 years of commercial use. The service life only covers damage to the panels due to wear and tear under normal load in accordance with the conditions of use.
The use of laminate flooring in humid or damp areas (bathroom, sauna, etc.) is not included in the recommended operating conditions. Damage caused by excessive loading, mechanical inuences or improper use, including careless or neglected maintenance, is not within the permissible limits of use. In order to confirm proper maintenance, it is necessary to provide receipts for the manufacturer’s recommended care products specifically designed for this type
of floor.
In the event of a defect, the claim must be made in writing and must be accompanied by the original purchase receipt within 30 days. Before making a decision, the manufacturer reserves the right to inspect the damage on site or to submit the assessment to a third party (Fig. 2).
Within the framework of operation, if the case is confirmed, the damaged areas are either repaired at the manufacturer’s discretion or a replacement for the worn
coating is delivered.
TRANSPORTATION AND ACCLIMATIZATION
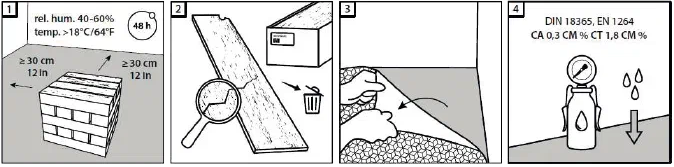
To preserve the quality of the laminate before installation, it must be stored in its original sealed packaging, on a flat horizontal surface, in a closed place at a temperature of +18°C to +28°C and relative humidity of 35% to 65%. The distance to heat sources (heaters, batteries, etc.) should be at least one meter. It is important to maintain the temperature and humidity conditions throughout storage, laying and for 24 hours after completion. It is recommended that packages should be placed in stacks of no more than five pieces, without displacement in length and width, and without overlapping. Storage outdoors, even under a shelter, is strictly prohibited. The laminate should be allowed to acclimatize in the installation room for at least 48 hours before installation. Unpack the material immediately before laying to avoid deformation and to ensure precise jointing of the locks (Fig. 1-4).
CAN BE LAID ON
- chipboard and OSB constructions;
- mineral basements (concrete, cement screed, etc.);
- other types of coatings – on condition that the surface is hard, even and dry.
WARM FLOOR SYSTEM
- FLOOREO laminate can be installed on floors with electric heating systems, including electric film heaters, provided that the following conditions are met:
- the system is equipped with temperature sensors and temperature regulators to prevent overheating;
- the heating elements are distributed evenly throughout the floor area;
- the maximum temperature on the oor surface must not exceed +28°C;
- before installing FLOOREO laminate, it is recommended to turn on the system of oor heating at maximum power to remove residual moisture from the substrate;
- the heating should be switched off at least 24 hours before installation, as well as during installation and for 24 hours afterwards;
- starting the system after installation should be done gradually, increasing the temperature by 5°C per day until the operating mode is reached.
Attention: when using an electric heating mat that is not built into the floor, it is recommended to use a foil pad laid with the reflective side facing upwards.
2. FLOOREO laminate can also be laid on surfaces with built-in water heating. In this case, the thickness of the cement screed should be at least 12 mm and the operating temperature should not exceed +28°C.
Compliance with these recommendations will help to avoid deformation, blistering and other damage to the laminate due to overheating.
Important: due to the relatively low thermal conductivity of laminate, under oor heating should not be used as the main heating system, but only as a way to maintain a comfortable floor. temperature
PREPARATION OF THE BASEMENT
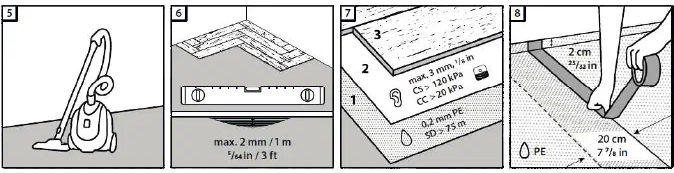
Before laying the FLOOREO floor covering, it is necessary to prepare the base: it must be dry, even, hard and free of dust and dirt. The surface must comply with the requirements of СП 71.13330.2017 “Insulation and nishing coatings” (Fig. 3, 5-8).
The strength of the concrete base and screed should be at least 15 MPa. Permissible humidity:
- for concrete slabs – not more than 4%,
- for cement-sand screeds – not more than 5%.
The height difference must not exceed 1 mm per 1 linear meter. If this value is exceeded, the surface must be leveled with a layer at least 5 mm thick using appropriate materials, e.g. self-leveling mixtures.
Before applying the self-levelling layer, the base should be cleaned of cement build-up, dust, dirt and primed with 5% Polyvinyl acetate dispersion solution in accordance with ГОСТ 18992-80*.
MINERAL BASEMENTS AND TILES
When laying on mineral substrates, always use a vapor barrier (Fig. 3, 5-8).
BACKING
For FLOOREO laminate installation it is recommended to use a noise-isolating carpet pad – it improves acoustic comfort, compensates for minor unevenness of the substrate and protects the locking system during operation (Fig. 3, 5-8).
The optimal substrate thickness is 3 mm, with a density of about 180 kg/m³ and a compressive strength of at least 200 kPa. Backing with such characteristics provides stable support and prolongs the service life of the coating. The use of materials with low density and weak resistance to loads may cause damage to the locks and invalidate the warranty.
To protect against moisture, it is recommended to lay the vapor barrier lm under the soundproof backing, especially when installing on mineral or cold basement. The backing material (sheets or rolls) should be laid back-to-back, without gaps. For stability and xation it is recommended to glue the joints of the backing with adhesive tape. After the whole basement is covered with backing, you can start laying the laminate.
MATERIALS AND TOOLS FOR INSTALLATION
- Level, guide strip
- Vapor barrier film
- Backing. Thickness of at least 2-3 mm.
- Ruler, tape measure
- Angle, angle of inclination
- Pencil or felt-tip pen
- Wedges with a gap of 10 mm
- Scotch tape 50 mm wide
- Saw
- Hammer
INSTALLATION
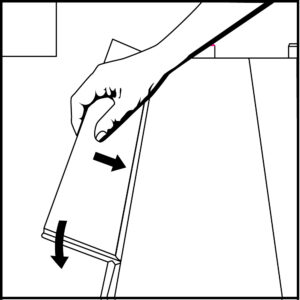
Before starting the installation carefully inspect each FLOOREO panel under natural light. Make sure that there are no visible defects, mechanical damage or color variations. Also check the straightness of the edges. Laying of panels with visual defects is not allowed – claims after installation are not considered (Fig. 2, 9-11). It is recommended to lay the laminate in the direction of the main light source (usually towards the window) to emphasize the texture and reduce the visibility of the joints. For even distribution of shade and texture, alternate panels from 3-4 different packages.
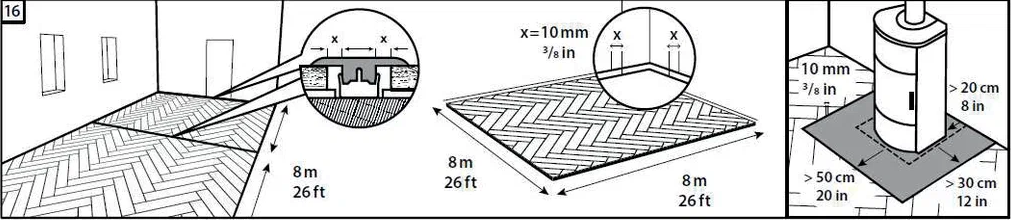
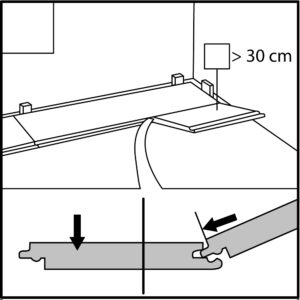
Laminate is installed using a method of oating mounting without glue. Always leave a technical gap of at least 10 mm between the flooring and all fixed elements: walls, columns, pipes, etc. The joints of the end sides (on the short side) in neighboring rows must be offset by at least 30 cm. Avoid short cuts of less than 30 cm at the beginning and end of rows. The minimum width of the last row is 50 mm. If necessary, cut the rst row to maintain this proportion. In narrow rooms (e.g. corridors) it is better to lay the panels along the length of the room. It is recommended to calculate the number of rows before laying to achieve a symmetrical and aesthetic result.
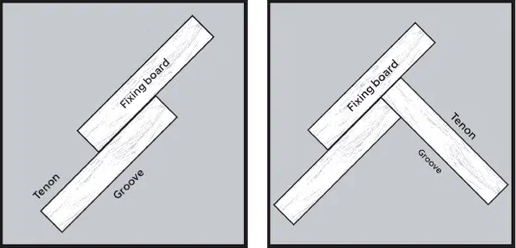
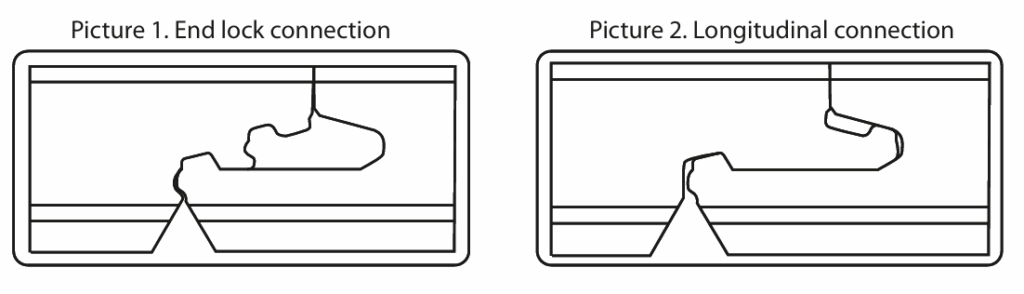
Characteristics of the FLOOREO locking system:
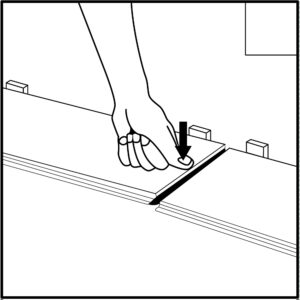
One side of the board has a characteristic protrusion called a “groove”. The other side has a correspondingly sized – “tongue”. The groove of one board is inserted into the tongue of the other board.
The picture (1) shows an end-lock connection on the short side: the groove on the short side of the board is inserted horizontally into the tongue of the other board, without inclination. The locks are waxed beforehand, which makes the joint easier and increases moisture resistance.
The picture (2) shows the connection along the long side: the groove is inserted into the tongue at an angle, and then the board is lowered down until it clicks into place, ensuring a secure xation.
This connection system simplifies the laying process, making it quick and easy even for non-professionals.
FINISHING OF INSTALLATION
When the installation is finanalized, install the skirting board to cover the expansion gap and give the room a finished look. The skirting board should only be fixed to the wall and not to the flooring.
In doorways and at the transition points to other floor coverings, it is necessary to use thresholds, moldings or other finishing elements to protect the exposed edges. It is important not to clamp the panels rigidly – an expansion gap of at least 6 mm must always be maintained between the floor covering and the finishing elements.
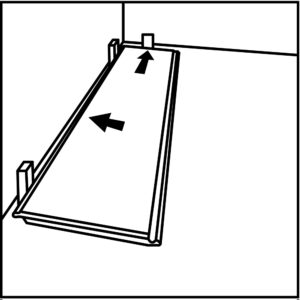
STEP 1: Start installation
Start laying from the right corner of the room, placing the boards with the lock inside the room. Proceed from right to left.
IMPORTANT: measure the length of the room before laying. Calculate the number of rows so that the width of the last board is at least 50 mm. If it is less, cut the boards of the rst row. When marking out the minimum width of the last board – 50 mm.
STEP 2: Connecting the boards
Use the system to join the short sides (end). Simply insert the groove of one board into the tongue of the other. The locks are treated with wax, which makes
the joint easier and increases moisture resistance.
STEP 3: Completing the first row
Lower the board down until it is completely horizontal.
The last board of the rst row should be no shorter than 30 cm. If necessary, cut a suitable length from the new board.
STEP 4: Installation of the second and subsequent rows
Start the second row with the cut off part of the board of the previous row (at least 30 cm). First join the board on the long side.
At an angle (not more than 200) bring the board to the previous row, insert the ridge into the groove and lower the board down.
Then, using the system, connect the short end to the previous board.
Be sure to keep the joint spacing between the rows at least 30 cm.
STEP 5: Installation of the last rows
After laying two rows, install spacing wedges between the boards and the wall. The expansion gap should be at least 10 mm.
End of the row: lay the board at the place of laying and mark the cut-off line, leaving an expansion gap of 10 mm from the wall.
Last row: lay the boards of the last row with the decorative side down on top of the already laid boards. Mark the line for the expansion gap, saw off and install the boards.
If necessary, use a mounting bracket to tighten the last board.
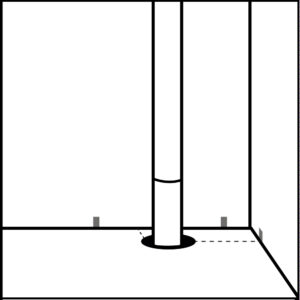
INSTALLATION IF PIPES ARE PRESENT
If pipes are present, measure the pipe diameter. Add 12 mm to this diameter and cut the required holes. Saw the
board in half and lay it by gluing both parts at the ends with polyvinyl acetate glue.
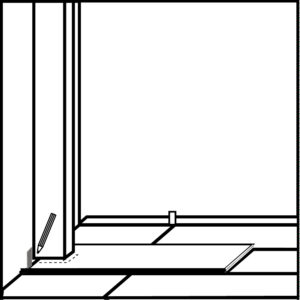
DOORWAYS
Turn the board face down. Insert it under the door frame (molding) and draw the outline of the door frame, remembering to keep a 6 mm margin, remove the board and remove the drawn block.